How Automating Web Browsers with Selenium and C# in VS Code Using Cursor AI Assistant

Automation is transforming the software development process—making testing faster, reducing repetitive tasks, and improving productivity. In this guide, we’ll explore how to automate web browsers using Selenium with C# inside Visual Studio Code, and more specifically, how to boost your workflow using the Cursor AI assistant (v1.1.5).

🧠 Cursor is an AI-powered coding assistant embedded directly into VS Code. It helps write, explain, and debug code faster using natural language prompts.


🔧 Prerequisites

Before diving in, make sure the following tools are installed:

  • .NET SDK (6.0 or later)Download
  • Visual Studio Code (v1.96.2 or later)Download
  • Cursor AI extension (v1.1.5) – Installed from https://www.cursor.so/
  • Google Chrome and ChromeDriver
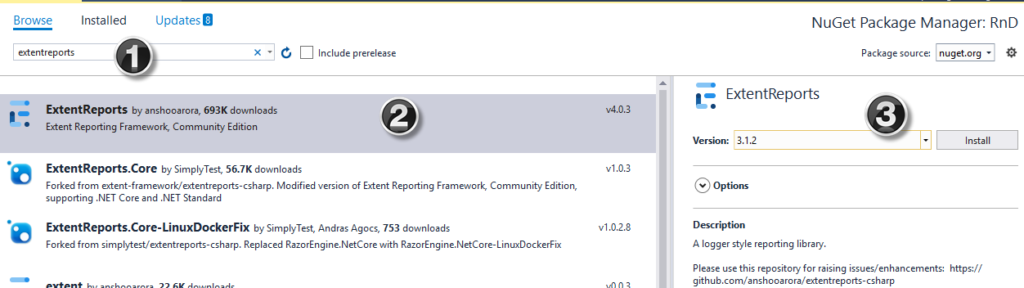
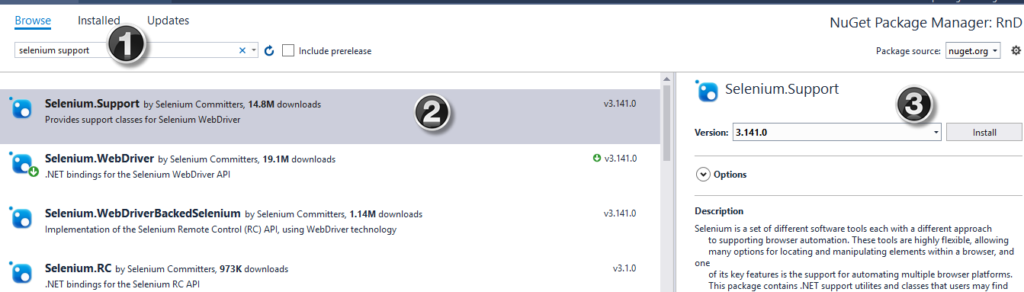
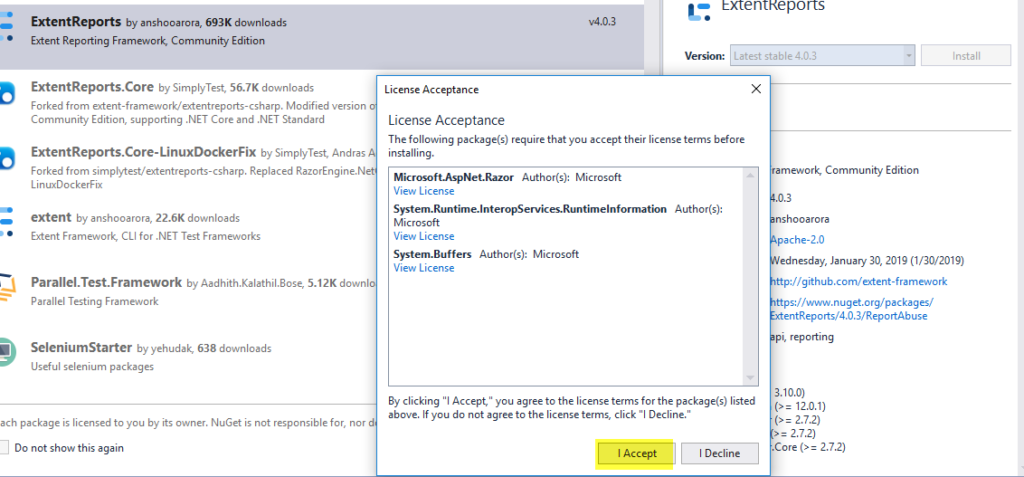
  • NuGet packages for Selenium

🚀 Step 1: Create a New C# Project with Cursor

Open VS Code with Cursor enabled and type:

dotnet new console -n SeleniumAutomation
cd SeleniumAutomation

Ask Cursor:
💬 “Add Selenium dependencies to this C# project using NuGet.”

It will auto-generate the correct command:

💻 Step 2: Automate a Browser Using Selenium

Open Program.cs, and type this prompt into Cursor:

💬 “Create a sample Selenium script in C# that opens Chrome, searches on Google, and closes the browser.”

Cursor will generate code similar to this:

using OpenQA.Selenium;
using OpenQA.Selenium.Chrome;
using System;
using System.Threading;

class Program
{
    static void Main()
    {
        using var driver = new ChromeDriver();
        driver.Navigate().GoToUrl("https://www.google.com");

        var searchBox = driver.FindElement(By.Name("q"));
        searchBox.SendKeys("Selenium with C#");
        searchBox.SendKeys(Keys.Enter);

        Thread.Sleep(3000);
        driver.Quit();
    }
}

🧠 Step 3: Debug & Explain with Cursor

Highlight any part of your code and ask:

💬 “Explain this line.”
💬 “How can I wait until the element is visible?”
💬 “Convert this to use WebDriverWait.”

Cursor will rewrite or enhance the logic with contextual explanations.


🖱 Bonus: Automating Actions via JavaScript

Want to simulate mouse interaction or click buttons? Try:

IJavaScriptExecutor js = (IJavaScriptExecutor)driver;
js.ExecuteScript("document.querySelector('input[name=q]').click();");

You can prompt Cursor:
💬 “Use JavaScriptExecutor to click a button by CSS selector.”

You can prompt Cursor:
💬 “Use JavaScriptExecutor to click a button by CSS selector.”


🧪 Cursor for Test Automation Engineers

Cursor can also:

  • Suggest NUnit test structure
  • Generate test classes from comments
  • Refactor repeated Selenium actions into reusable methods
  • Provide answers from docs directly in VS Code

✅ Benefits of Using Cursor with Selenium in VS Code

FeatureBenefit
Code generationFaster setup of boilerplate Selenium scripts
Auto-debuggingFixes C# errors and Selenium exceptions instantly
Natural language supportReduces context switching—write code by asking
Seamless integrationStays inside VS Code, no need for external tools

🧩 Conclusion

Combining Selenium, C#, and Cursor AI inside VS Code creates a supercharged automation workflow. Whether you’re a QA engineer or a developer, this setup will save hours, reduce complexity, and allow you to test smarter—not harder.

Mastering Azure AI with AI-102: My Certification Journey and Key Takeaways

Introduction

In today’s AI-driven world, cloud-based solutions like Microsoft Azure are enabling developers to build intelligent applications at scale. I recently completed the AI-102 certification, which focuses on designing and implementing Azure AI solutions. This post shares what I learned, what the exam covers, and why this certification matters for any AI enthusiast or cloud professional.

What the AI-102 Exam Covers

The AI-102 exam measures your ability to design and implement an Azure AI solution that includes:

  1. Planning and Managing Azure AI Solutions (15-20%)
  2. Natural Language Processing (NLP) Solutions (20–25%)
  3. Computer Vision Solutions (20–25%)
  4. Conversational AI Solutions (15–20%)
  5. Integrating AI Models into Applications (15–20%)

What You Learn

During preparation, you gain hands-on experience and knowledge in:

  • Using Azure AI services like Cognitive Services, Language Understanding (LUIS), Azure OpenAI, and Speech Services
  • Building chatbots using Azure Bot Service and Power Virtual Agents
  • Creating image classification and object detection systems
  • Designing and deploying custom AI models with Azure Machine Learning
  • Integrating AI capabilities into web, mobile, or enterprise applications

What You Achieve

By completing AI-102, you:

  • Become a Microsoft Certified Azure AI Engineer Associate
  • Validate your skills in building enterprise-grade AI solutions
  • Gain credibility for roles such as AI Engineer, ML Developer, or Solution Architect
  • Build confidence in applying AI in real-world cloud environments
  • Open up career paths in AI and cloud-native software development

Why This Certification Matters

  • AI-102 is role-based and aligns with industry needs
  • Employers look for Azure-certified professionals due to increased demand for AI integration
  • It helps you stand out in a competitive job market
  • Great stepping stone for advanced certifications or specialized AI roles

How Automating Web Browsers with Selenium and C# in VS Code using Cursor with Command

Web automation is now a cornerstone in software testing and task scripting, allowing developers and testers to simulate user behavior, perform regression testing, and automate repetitive actions. One of the most powerful tools for browser automation is Selenium, and with the rise of cross-platform development, many are now using C# in Visual Studio Code (VS Code) to build these solutions.

In this blog, we’ll walk through how to set up and use Selenium with C# in VS Code, and execute browser commands programmatically using Cursor to mimic user interactions.

Why Selenium with C#?

Selenium supports multiple programming languages, but C# offers robust object-oriented support, great performance, and a rich ecosystem with .NET. It’s a preferred choice in enterprises and QA teams familiar with Microsoft technologies.

Benefits of using C# with Selenium:

  • Strong typing and compile-time checks
  • Easy integration with NUnit/XUnit for testing
  • Full .NET Core compatibility for cross-platform automation
  • Rich LINQ support for manipulating test data

Prerequisites

Before jumping into code, ensure you have the following installed:

Step-by-Step Setup

1. Create a New Console App

dotnet new console -n SeleniumAutomation
cd SeleniumAutomation

2. Add Selenium WebDriver NuGet Packages

Use the following commands to install necessary libraries:

dotnet add package Selenium.WebDriver
dotnet add package Selenium.WebDriver.ChromeDriver
dotnet add package Selenium.Support

3. Code: Launching and Controlling Browser

Open the Program.cs file and write the following code:

using OpenQA.Selenium;
using OpenQA.Selenium.Chrome;
using System;
using System.Threading;

class Program
{
    static void Main(string[] args)
    {
        ChromeOptions options = new ChromeOptions();
        options.AddArgument("--start-maximized");  // Open browser in maximized mode
        using IWebDriver driver = new ChromeDriver(options);

        driver.Navigate().GoToUrl("https://www.google.com");
        Thread.Sleep(2000); // Wait for 2 seconds

        IWebElement searchBox = driver.FindElement(By.Name("q"));
        searchBox.SendKeys("Selenium WebDriver with C#");
        searchBox.SendKeys(Keys.Enter);

        Thread.Sleep(4000); // View results

        driver.Quit(); // Close browser
    }
}

Using Cursor Commands to Simulate Human-Like Actions

For more realistic user interaction, we can control the cursor or mouse pointer using external libraries like InputSimulator or native Windows API wrappers. Here’s an example using the System.Windows.Forms.Cursor for simple movement (only works on Windows):

Add Reference

dotnet add package System.Windows.Forms

Simulate Cursor Movement

using System.Windows.Forms;
using System.Drawing;

class CursorDemo
{
    public static void MoveCursor()
    {
        // Move the cursor to a specific location (x:100, y:200)
        Cursor.Position = new Point(100, 200);
        Console.WriteLine("Cursor moved to (100, 200)");
    }
}

Automating Clicks Using JavaScript with Selenium

You can also execute mouse-like interactions via JavaScript when real cursor movement isn’t necessary:

IJavaScriptExecutor js = (IJavaScriptExecutor)driver;
js.ExecuteScript("document.querySelector('input[name=q]').click();");

Running and Debugging in VS Code

To run the project in VS Code:

  1. Open your project folder in VS Code.
  2. Press Ctrl + Shift + P, select .NET: Generate Assets for Build and Debug.
  3. Press F5 to build and run the application.
  4. The browser should launch and perform the automated actions.

Tips for Effective Browser Automation

  • Always wait for elements to be visible using WebDriverWait or ExpectedConditions.
  • Handle exceptions to prevent hanging browsers.
  • Use headless mode for CI/CD environments:
options.AddArgument("--headless");
  • Log your test steps using Console.WriteLine() or integrate with logging frameworks.

Conclusion

Automating browsers with Selenium and C# in VS Code is a powerful way to streamline testing and repetitive tasks. With cursor control, you can simulate real user actions and make your automation scripts more interactive. Whether you’re automating form submissions, scraping data, or testing web apps, this setup gives you all the flexibility you need in a lightweight and efficient environment.

Automation Testing with C#

Unlock the Power of Automation Testing with C#!

📅 Date: November 1, 2024
🕒 Time: 3 PM – 4 PM
📍 Hosted by IT Magnet

Are you ready to elevate your automation testing skills? Join me, Rony Barua, an experienced SQA Lead, as I host an exclusive webinar on Automation Testing with C#. This session is designed to guide both newcomers and seasoned professionals through the transformative potential of Visual Studio for automation testing. Whether you’re looking to refine your skills or gain insights into the latest techniques, this webinar is the perfect opportunity!

What You’ll Learn:

  • Setting Up Visual Studio for Automation: Learn how to configure and optimize Visual Studio for seamless automation testing.
  • Core Automation Techniques: Discover effective practices to streamline your testing processes.
  • Integration with Selenium and Other Tools: Explore integrations with popular tools to enhance your testing capabilities.
  • Best Practices and Real-World Tips: Get insights from my years of experience in the field and learn practical tips to avoid common pitfalls.

Why Join?

Automation testing is essential in today’s fast-paced development environment. By mastering Visual Studio as a testing tool, you’re not only improving your skills but also contributing to the efficiency and reliability of your projects.

How API Testing with C# and RestSharp

API testing is an essential part of the software development lifecycle, focusing on the communication and data exchange between different software systems. It verifies that APIs are functioning correctly and meeting performance, reliability, and security standards. Using C# with the RestSharp library simplifies the process of interacting with RESTful APIs by providing an easy-to-use interface for making HTTP requests.

Using Paste Special in Visual Studio to Generate C# Classes from JSON

Visual Studio offers a feature called “Paste Special” that allows you to easily generate C# classes from JSON objects. This is particularly useful when working with web APIs or any JSON data, as it automates the creation of data models that match the JSON structure.

  1. Copy the JSON Object:
    • Ensure you have your JSON object copied to the clipboard. For example
  1. Open Visual Studio:
    • Launch Visual Studio and open the project where you want to add the new classes.
  2. Add a New Class File:
    • In Solution Explorer, right-click on the folder where you want to add the new class.
    • Select Add > New Item….
    • Choose Class and give it a meaningful name, then click Add.
  3. Use Paste Special:
    • Open the newly created class file (e.g., MyClass.cs).
    • Delete any default code in the class file.
    • Go to Edit > Paste Special > Paste JSON as Classes.
  4. Review the Generated Code:
  5. Visual Studio will automatically generate C# classes that correspond to the JSON structure. For the example JSON, it would generate something like this:

How to input value into an international number text box in selenium

Below is the text box and the corresponding HTML:

If I used sendkeys, sometimes it may not working

driver.findElement(By.name(“mainphone”)).sendKeys(“(02)2222-2222”);
driver.findElement(By.id(“mobilephone”)).sendKeys(“05-5555-5555”);

If sendkeys() methods are not working then use following two ways to input text:

Before sendkeys() use click() method to click inside textfield i.e:

driver.findElement(By.name("mainphone")).click();
driver.findElement(By.name("mainphone")).sendKeys("(02)2222-2222");   
driver.findElement(By.id("mobilephone")).click();
driver.findElement(By.id("mobilephone")).sendKeys("05-5555-5555"); 

Open chrome mobile emulator with selenium c#

Hi guys, I am going to run a test mobile emulator with selenium and VS C#

Import

using System;
using System.Threading;
using NUnit.Framework;
using OpenQA.Selenium;
using OpenQA.Selenium.Support.UI;
using OpenQA.Selenium.Chrome;

Driver Utils Class

First of all delclaring the webdriver, which will be used for open specfic browser

namespace SeleniumAutomation
{
[TestClass]
public class Setup
  {
       IWebDriver webDriver;
  }
}

Open Chrome

[Test]
public void Open_Browser()
{
 webDriver = new ChromeDriver();

}

Open Chrome Mobile Emulator

 [Test]
 public void Mobile_Emulator_Browser()
 {
 ChromeOptions chromeCapabilities = new ChromeOptions();
 chromeCapabilities.EnableMobileEmulation("Pixel 5");
 webDriver = new ChromeDriver(chromeCapabilities);

 }

I think it will be helpful to run chrome in mobile emulator

How to Use ExtentReports in .NET Selenium Automation Projects

Reports play a fundamental role when it comes to TESTING. Tester can now know the real-time reports of test suit execution. Reports made ease to know the ratio of Pass? Or Fail? Post-test suit execution and it is the only documentation to know about test execution results.

Everyone wish to see the detailed description of the test results. Don’t you? here is the solution for it. And, let us see how these reports can be achieved? in Selenium C# – NUnit framework automation testing.

To achieve detailed test execution results as HTML reports we need to rely on third party tool called => Extent Reports. These reports provide decent narration of test execution results and are depicted in PIE chart.

How to Reference Extent Reports in MS Visual Studio

Extent Reports can be directly referenced via NuGet Gallery:

Step 1) Project> Manage NuGet Packages

Step 2) In the next window

  1. Search for ExtentReports
  2. Select the search result
  3. Click Install

Step 3) Install selenium support from NuGet package

Step 3) Click ‘I Accept’

Step 4) Create a new C# class with the below code for Extent Reports.

using System;
using System.Collections.Generic;
using System.Linq;
using System.Text;
using System.Threading.Tasks;

using OpenQA.Selenium;
using OpenQA.Selenium.Support.UI;
using OpenQA.Selenium.Chrome;

using NUnit.Framework;
using NUnit.Framework.Interfaces;
using NUnit;

using AventStack.ExtentReports.Reporter;
using AventStack.ExtentReports;
using System.IO;

namespace RnD
{
    [TestFixture]
    public class TestDemo1
    {
        public IWebDriver driver;

        public static ExtentTest test;
        public static ExtentReports extent;

        [SetUp]
        public void Initialize()
        {
            driver = new ChromeDriver();
        }


        [OneTimeSetUp]
        public void ExtentStart()
        {
            
            extent = new ExtentReports();
            var htmlreporter = new ExtentHtmlReporter(@"D:\ReportResults\Report" + DateTime.Now.ToString("_MMddyyyy_hhmmtt") + ".html");
            extent.AttachReporter(htmlreporter);

        }


        [Test]
        public void BrowserTest()
        {
            test = null;
            test = extent.CreateTest("T001").Info("Login Test");

            driver.Manage().Window.Maximize();
            driver.Navigate().GoToUrl("http://testing-ground.scraping.pro/login");
            test.Log(Status.Info, "Go to URL");

            //provide username
            driver.FindElement(By.Id("usr")).SendKeys("admin");
            //provide password
            driver.FindElement(By.Id("pwd")).SendKeys("12345");

            try
            {
                WebDriverWait wait = new WebDriverWait(driver, TimeSpan.FromSeconds(1));
                wait.Until(ExpectedConditions.ElementIsVisible(By.XPath("//h3[contains(.,'WELCOME :)')]")));
                //Test Result
                test.Log(Status.Pass, "Test Pass");

            }

            catch (Exception e)

            {
                test.Log(Status.Fail, "Test Fail");
                throw;

            }
        }

        [TearDown]
        public void closeBrowser()
        {
            driver.Close();
        }

        [OneTimeTearDown]
        public void ExtentClose()
        {
            extent.Flush();
        }
    }
}

Post running test method, the test execution report looks as shown below: