Continuous Testing in CI/CD Pipelines: Why It Matters and How to Do It Right

In the fast-paced world of modern software development, speed, reliability, and quality are non-negotiable. That’s where Continuous Testing (CT) steps in—an integral part of any CI/CD pipeline that ensures every code change is automatically tested before it reaches production.

In this blog post, we’ll explore what continuous testing is, why it’s critical in CI/CD pipelines, the benefits it offers, and how you can implement it effectively.


🚀 What is Continuous Testing?

Continuous Testing is the practice of executing automated tests at every stage of the software delivery lifecycle. This ensures that defects are identified and resolved as early as possible—ideally, right after a developer commits code.

It goes beyond just unit tests. It includes:

  • Unit Testing
  • Integration Testing
  • API Testing
  • End-to-End (E2E) Testing
  • Performance & Load Testing
  • Security Testing

🛠️ Role of Continuous Testing in CI/CD Pipelines

CI/CD pipelines enable continuous integration (merging code changes frequently) and continuous delivery/deployment (releasing software rapidly and reliably).

Without continuous testing:

  • Bugs can slip into production
  • Releases become risky
  • Rollbacks become frequent and painful

With continuous testing:

  • Tests run automatically at every pipeline stage
  • Builds are verified in real-time
  • Feedback loops shorten dramatically
  • Teams gain confidence in faster releases

💡 Benefits of Continuous Testing

  1. Early Bug Detection
    • Fixing bugs earlier reduces cost and rework.
  2. Faster Feedback
    • Developers get instant insights into code quality after each commit.
  3. Improved Release Velocity
    • With automated gates in place, teams can release more frequently.
  4. Higher Test Coverage
    • Automation allows broad testing across browsers, devices, APIs, and integrations.
  5. Risk Reduction
    • Security, compliance, and performance issues are detected pre-production.

🔧 How to Implement Continuous Testing Effectively

Here’s a practical guide:

1. Automate Everything

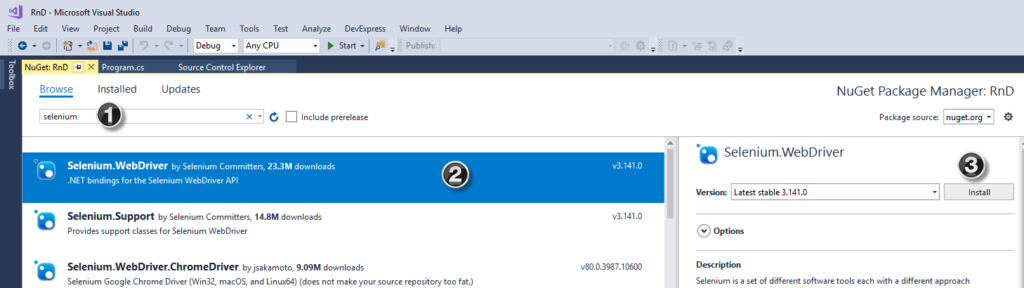
  • Use frameworks like JUnit, TestNG, PyTest, Selenium, Postman/Newman, or Cypress.
  • Ensure tests are fast and reliable.

2. Shift Left

  • Integrate testing as early as the development stage.
  • Run unit and integration tests as part of the pre-commit hooks.

3. Use CI/CD Tools

  • Popular options: GitHub Actions, GitLab CI, Jenkins, Azure DevOps, CircleCI, Travis CI.
  • Configure pipelines to trigger tests on every push or pull request.

4. Incorporate Test Stages

  • Build Stage: Unit & lint checks
  • Pre-deploy Stage: Integration, security scans
  • Post-deploy Stage: Smoke tests, performance monitoring

5. Containerization Helps

  • Use Docker for consistent test environments.
  • Easier to scale and replicate across teams.

6. Monitor and Report

  • Use tools like Allure Reports, JUnit reports, or custom dashboards.
  • Make test results visible and accessible.

🧠 Best Practices

  • Keep tests deterministic—no random failures.
  • Run tests in parallel to speed up pipelines.
  • Use mock data and services to isolate tests.
  • Regularly review and prune flaky tests.
  • Adopt Test-Driven Development (TDD) where applicable.

📊 Real-World Example: GitHub Actions + Cypress

# .github/workflows/ci.yml
name: CI

on: [push, pull_request]

jobs:
  test:
    runs-on: ubuntu-latest
    steps:
      - uses: actions/checkout@v3
      - name: Install Dependencies
        run: npm install
      - name: Run Tests
        run: npm run test
      - name: Run E2E Tests
        run: npm run cypress:run

This simple pipeline installs dependencies, runs unit tests, and launches Cypress for E2E testing—all automatically on each commit.


🔚 Conclusion

Continuous Testing isn’t just a best practice—it’s a necessity in modern DevOps and agile teams. By embedding testing into your CI/CD pipelines, you build robust, secure, and reliable software faster.

Whether you’re a solo developer or part of a large team, investing in a smart testing strategy pays off in quality and customer satisfaction.

How Automating Web Browsers with Selenium and C# in VS Code using Cursor with Command

Web automation is now a cornerstone in software testing and task scripting, allowing developers and testers to simulate user behavior, perform regression testing, and automate repetitive actions. One of the most powerful tools for browser automation is Selenium, and with the rise of cross-platform development, many are now using C# in Visual Studio Code (VS Code) to build these solutions.

In this blog, we’ll walk through how to set up and use Selenium with C# in VS Code, and execute browser commands programmatically using Cursor to mimic user interactions.

Why Selenium with C#?

Selenium supports multiple programming languages, but C# offers robust object-oriented support, great performance, and a rich ecosystem with .NET. It’s a preferred choice in enterprises and QA teams familiar with Microsoft technologies.

Benefits of using C# with Selenium:

  • Strong typing and compile-time checks
  • Easy integration with NUnit/XUnit for testing
  • Full .NET Core compatibility for cross-platform automation
  • Rich LINQ support for manipulating test data

Prerequisites

Before jumping into code, ensure you have the following installed:

Step-by-Step Setup

1. Create a New Console App

dotnet new console -n SeleniumAutomation
cd SeleniumAutomation

2. Add Selenium WebDriver NuGet Packages

Use the following commands to install necessary libraries:

dotnet add package Selenium.WebDriver
dotnet add package Selenium.WebDriver.ChromeDriver
dotnet add package Selenium.Support

3. Code: Launching and Controlling Browser

Open the Program.cs file and write the following code:

using OpenQA.Selenium;
using OpenQA.Selenium.Chrome;
using System;
using System.Threading;

class Program
{
    static void Main(string[] args)
    {
        ChromeOptions options = new ChromeOptions();
        options.AddArgument("--start-maximized");  // Open browser in maximized mode
        using IWebDriver driver = new ChromeDriver(options);

        driver.Navigate().GoToUrl("https://www.google.com");
        Thread.Sleep(2000); // Wait for 2 seconds

        IWebElement searchBox = driver.FindElement(By.Name("q"));
        searchBox.SendKeys("Selenium WebDriver with C#");
        searchBox.SendKeys(Keys.Enter);

        Thread.Sleep(4000); // View results

        driver.Quit(); // Close browser
    }
}

Using Cursor Commands to Simulate Human-Like Actions

For more realistic user interaction, we can control the cursor or mouse pointer using external libraries like InputSimulator or native Windows API wrappers. Here’s an example using the System.Windows.Forms.Cursor for simple movement (only works on Windows):

Add Reference

dotnet add package System.Windows.Forms

Simulate Cursor Movement

using System.Windows.Forms;
using System.Drawing;

class CursorDemo
{
    public static void MoveCursor()
    {
        // Move the cursor to a specific location (x:100, y:200)
        Cursor.Position = new Point(100, 200);
        Console.WriteLine("Cursor moved to (100, 200)");
    }
}

Automating Clicks Using JavaScript with Selenium

You can also execute mouse-like interactions via JavaScript when real cursor movement isn’t necessary:

IJavaScriptExecutor js = (IJavaScriptExecutor)driver;
js.ExecuteScript("document.querySelector('input[name=q]').click();");

Running and Debugging in VS Code

To run the project in VS Code:

  1. Open your project folder in VS Code.
  2. Press Ctrl + Shift + P, select .NET: Generate Assets for Build and Debug.
  3. Press F5 to build and run the application.
  4. The browser should launch and perform the automated actions.

Tips for Effective Browser Automation

  • Always wait for elements to be visible using WebDriverWait or ExpectedConditions.
  • Handle exceptions to prevent hanging browsers.
  • Use headless mode for CI/CD environments:
options.AddArgument("--headless");
  • Log your test steps using Console.WriteLine() or integrate with logging frameworks.

Conclusion

Automating browsers with Selenium and C# in VS Code is a powerful way to streamline testing and repetitive tasks. With cursor control, you can simulate real user actions and make your automation scripts more interactive. Whether you’re automating form submissions, scraping data, or testing web apps, this setup gives you all the flexibility you need in a lightweight and efficient environment.

How to input value into an international number text box in selenium

Below is the text box and the corresponding HTML:

If I used sendkeys, sometimes it may not working

driver.findElement(By.name(“mainphone”)).sendKeys(“(02)2222-2222”);
driver.findElement(By.id(“mobilephone”)).sendKeys(“05-5555-5555”);

If sendkeys() methods are not working then use following two ways to input text:

Before sendkeys() use click() method to click inside textfield i.e:

driver.findElement(By.name("mainphone")).click();
driver.findElement(By.name("mainphone")).sendKeys("(02)2222-2222");   
driver.findElement(By.id("mobilephone")).click();
driver.findElement(By.id("mobilephone")).sendKeys("05-5555-5555"); 

Open chrome mobile emulator with selenium c#

Hi guys, I am going to run a test mobile emulator with selenium and VS C#

Import

using System;
using System.Threading;
using NUnit.Framework;
using OpenQA.Selenium;
using OpenQA.Selenium.Support.UI;
using OpenQA.Selenium.Chrome;

Driver Utils Class

First of all delclaring the webdriver, which will be used for open specfic browser

namespace SeleniumAutomation
{
[TestClass]
public class Setup
  {
       IWebDriver webDriver;
  }
}

Open Chrome

[Test]
public void Open_Browser()
{
 webDriver = new ChromeDriver();

}

Open Chrome Mobile Emulator

 [Test]
 public void Mobile_Emulator_Browser()
 {
 ChromeOptions chromeCapabilities = new ChromeOptions();
 chromeCapabilities.EnableMobileEmulation("Pixel 5");
 webDriver = new ChromeDriver(chromeCapabilities);

 }

I think it will be helpful to run chrome in mobile emulator

How to Use ExtentReports in .NET Selenium Automation Projects

Reports play a fundamental role when it comes to TESTING. Tester can now know the real-time reports of test suit execution. Reports made ease to know the ratio of Pass? Or Fail? Post-test suit execution and it is the only documentation to know about test execution results.

Everyone wish to see the detailed description of the test results. Don’t you? here is the solution for it. And, let us see how these reports can be achieved? in Selenium C# – NUnit framework automation testing.

To achieve detailed test execution results as HTML reports we need to rely on third party tool called => Extent Reports. These reports provide decent narration of test execution results and are depicted in PIE chart.

How to Reference Extent Reports in MS Visual Studio

Extent Reports can be directly referenced via NuGet Gallery:

Step 1) Project> Manage NuGet Packages

Step 2) In the next window

  1. Search for ExtentReports
  2. Select the search result
  3. Click Install

Step 3) Install selenium support from NuGet package

Step 3) Click ‘I Accept’

Step 4) Create a new C# class with the below code for Extent Reports.

using System;
using System.Collections.Generic;
using System.Linq;
using System.Text;
using System.Threading.Tasks;

using OpenQA.Selenium;
using OpenQA.Selenium.Support.UI;
using OpenQA.Selenium.Chrome;

using NUnit.Framework;
using NUnit.Framework.Interfaces;
using NUnit;

using AventStack.ExtentReports.Reporter;
using AventStack.ExtentReports;
using System.IO;

namespace RnD
{
    [TestFixture]
    public class TestDemo1
    {
        public IWebDriver driver;

        public static ExtentTest test;
        public static ExtentReports extent;

        [SetUp]
        public void Initialize()
        {
            driver = new ChromeDriver();
        }


        [OneTimeSetUp]
        public void ExtentStart()
        {
            
            extent = new ExtentReports();
            var htmlreporter = new ExtentHtmlReporter(@"D:\ReportResults\Report" + DateTime.Now.ToString("_MMddyyyy_hhmmtt") + ".html");
            extent.AttachReporter(htmlreporter);

        }


        [Test]
        public void BrowserTest()
        {
            test = null;
            test = extent.CreateTest("T001").Info("Login Test");

            driver.Manage().Window.Maximize();
            driver.Navigate().GoToUrl("http://testing-ground.scraping.pro/login");
            test.Log(Status.Info, "Go to URL");

            //provide username
            driver.FindElement(By.Id("usr")).SendKeys("admin");
            //provide password
            driver.FindElement(By.Id("pwd")).SendKeys("12345");

            try
            {
                WebDriverWait wait = new WebDriverWait(driver, TimeSpan.FromSeconds(1));
                wait.Until(ExpectedConditions.ElementIsVisible(By.XPath("//h3[contains(.,'WELCOME :)')]")));
                //Test Result
                test.Log(Status.Pass, "Test Pass");

            }

            catch (Exception e)

            {
                test.Log(Status.Fail, "Test Fail");
                throw;

            }
        }

        [TearDown]
        public void closeBrowser()
        {
            driver.Close();
        }

        [OneTimeTearDown]
        public void ExtentClose()
        {
            extent.Flush();
        }
    }
}

Post running test method, the test execution report looks as shown below:

How to setup selenium webdriver with c#

Set Up Visual Studio with Selenium WebDriver:

Create a new project in Visual Studio:

Step 1) In the File Menu, Click New > Project

Step 2) In the next screen

  1. Select the option ‘Visual C#’
  2. Click on Console App (.Net Framework)
  3. Enter name as “RnD”
  4. Click OK

Step 3) The below screen will be displayed once the project is successfully created.

Set up Visual Studio with Selenium WebDriver:

Step 1) Navigate to Project-> Manage NuGet Packages

Step 2) In the next screen

  1. Search for Selenium on the resultant screen
  2. Select the first search result
  3. Click on ‘Install’

Step 3) The below message will be displayed once the package is successfully installed

Steps to install NUnit Framework:

Step 1) Navigate to Project-> Manage NuGet Packages

Step 2) In the next window

  1. Search for NUnit
  2. Select the search result
  3. Click Install

Step 3) The below message will appear once the installation is complete.

Steps to download NUnit Test Adapter

Please note that the below steps work only for 32-bit machines. For 64-bit machines, you need to download the ‘NUnit3 Test Adapter’ by following the same process as mentioned below.

Step 1) Navigate to Project-> Manage NuGet Packages

Step 2) In the next window

  1. Search NUnitTestAdapter
  2. Click Search Result
  3. Click Install

Step 3) Once install is done you will see the following message

Steps to download Chrome Driver

Step 1) Navigate to Project-> Manage NuGet Packages

Step 2) In the next window

  1. Search for Chromdriver
  2. Select the search result
  3. Click Install

Step 3) System may asked for permission. Click on ‘Yes to All’

Step 4) The below message will appear once the installation is complete.

Selenium and NUnit framework:

Selenium with NUnit framework allows differentiating between various test classes. NUnit also allows using annotations such as SetUp, Test, and TearDown to perform actions before and after running the test.

NUnit framework can be integrated with Selenium by creating a NUnit test class and running the test class using NUnit framework.

The below are the steps needed to create and run a test class using NUnit framework.

Steps to create a NUnit Test class in Selenium:

Step 1) In the Solution Explorer, Right clicked on project > Add > Class

Step 2) Class creation window will appear

  1. Provide a name to the class
  2. Click on Add button

Step 3) The below screen will appear.

Step 4) Add the following code to the created class. Please note that you need to specify the location of ‘chromdriver.exe’ file during chrome driver initialization.

using System;
using System.Collections.Generic;
using System.Linq;
using System.Text;
using System.Threading.Tasks;

using OpenQA.Selenium;
using OpenQA.Selenium.Support.UI;
using OpenQA.Selenium.Chrome;


using NUnit.Framework;
using NUnit.Framework.Interfaces;
using NUnit;

namespace RnD
{
    [TestFixture]
    public class TestDemo1
    {
        public IWebDriver driver;

        [SetUp]
        public void Initialize()
        {
            driver = new ChromeDriver();
        }

        [Test]
        public void BrowserTest()
        {
            driver.Manage().Window.Maximize();
            driver.Navigate().GoToUrl("https://www.google.com/");
        }

        [TearDown]
        public void closeBrowser()
        {
            driver.Close();
        }
    }
}

Step 4) Click on ‘Build’ -> ‘Build Solution’ or keypress ‘Ctrl + Shift + B’

Step 5) Once the build is successful, we need to open the Test Explorer window. Click on Test -> Windows -> Test Explorer

Step 6) Test Explorer window opens with the list of available tests. Right-click on Test Explorer and select Run Selected Tests

Step 7) Selenium must open the browser with specified URL and close the browser. Test case status will be changed to ‘Pass’ on the Test Explorer window.